Blog App Using MERN Stack
Github:https://github.com/mehulk05/Blogapp-using-MERN
Live Demo:https://mehulk05.github.io/Blogapp-using-MERN/
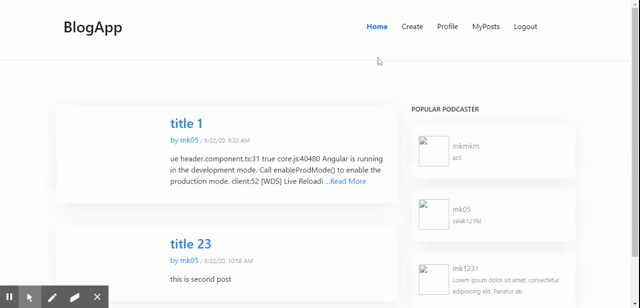
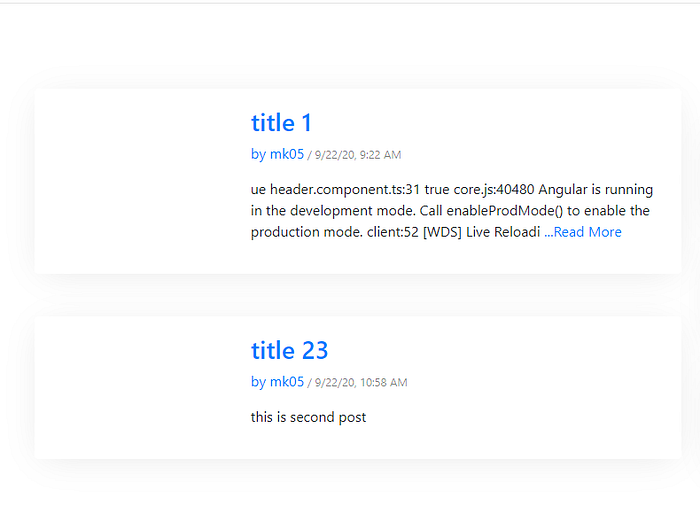
A demo of what we are creating
Let us understand what does MERN stack means.
Mongo DB– It’s an open-source NoSQL cross-platform document-oriented database.Express JS– It’s a web-based application framework work with Node JS, It helps to build web apps and RESTful APIs.React– React is a JavaScript library created by Facebook. React is a User Interface (UI) library. React is a tool for building UI componentsNode JS– It is a free JavaScript run-time environment, It executes JavaScript code outside of a browser. It is available for macOS, Windows, Linux, and Unix.
I will be using the following plugins and tools to create the MERN Stack app.
#1 Setup Node JS development environment
Follow this link to set up Node JS in your system. Simply download and install the node as per your system bit i.e 32 and 64 bit and OS
#2 Build a Node.JS Backend
To write the manageable code, we should keep the MERN Stack backend folder separate. Create a folder by the name of the backend or anything you like in React’s root directory. This folder will handle the backend code of our application, remember it will have the separate node_modules folder from React.
mkdir backend
cd backend
npm init -y
The above command will take you inside the backend folder and then generate package.json with all default configuration.
– Install and Configure required NPM packages for MERN Stack app development
Use the below command to install the following node modules.
npm install --save body-parser cors express mongoose- body-parser: The body-parser npm module is a JSON parsing middleware. It helps to parse the JSON data, plain text, or a whole object.
- CORS: This is a Node JS package, also known as the express js middleware. It allows enabling CORS with multiple options. It is available through the npm registry.
- Express.js: Express js is a free open source Node js web application framework. It helps in creating web applications and RESTful APIs and act as middleware
- Mongoose: Mongoose is a MongoDB ODM for Node. It allows you to interact with the MongoDB database.
Starting and stopping a server every time a change is made is a time-consuming task. To get rid of this problem we use nodemon the npm module. This package restarts the server automatically every time we make a change. We’ll be installing it locally by using the given below command.
npm install nodemon --save-devAlso, make sure to change the package.json to start nodemon
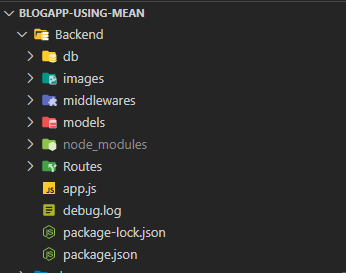
#3 Folder Structure for Backend
#4 Writing App.js
const path = require("path");
const express = require("express")
const mongoose = require("mongoose")const db = require("./db/db")
const postRouter = require("./Routes/post");const app = express();
app.use(bodyParser.json());
app.use(bodyParser.urlencoded({
   extended: false
}));
app.use(cors());const PORT = process.env.PORT || 3000app.use("/api/posts", postRouter)app.listen(PORT, (req, res) => {
console.log(`app is listening to PORT ${PORT}`)
})
#5 Writing db.js
To create the database you can go here to register and create a new database. Also, you will get the connection URL which I will be using in my code
const mongoose = require('mongoose');mongoose.Promise = global.Promise;const url = "mongodb://testuser:<password>@cluster0-shard-00-00.ecaql.mongodb.net:27017?ssl=true&replicaSet=atlas-ceza4t-shard-0&authSource=admin&retryWrites=true&w=majority"// Connect MongoDB at default port 27017.let mong = mongoose.connect(url, {
    useNewUrlParser: true,
    useCreateIndex: true,
    useUnifiedTopology: true
}, (err) => {
    if (!err) {
        console.log('MongoDB Connection Succeeded.')
    } else {
        console.log('Error in DB connection: ' + err)
    }
});
#6 Create Model with Mongoose JS
const mongoose = require('mongoose');const Post = mongoose.model('Post', {
    title: {
        type: String,
        required: true
    },content: {
        type: String,
        required: true
    },

});module.exports = Post
#7 Create RESTful APIs using Express JS Routes
# 8 Creating Frontend
Now we will be creating a brand new react project and we will set up our react project to interact with the backend which we have created in the above steps.
- Creating React App
npx create-react-app Blogapp-using-mern
cd Blogapp-using-mern
npm start
2. Setting Up Axios in Index.js
axios.defaults.baseURL = 'https://zany-periodic-fisherman.glitch.me/api';let userData = JSON.parse(localStorage.getItem("userData"))
let token
if (userData) {
  token = userData.token
}axios.defaults.headers.common['Authorization'] = `Bearer ${token}`;
axios.defaults.headers.post['Content-Type'] = 'application/json';axios.interceptors.request.use(request => {
  return request;
}, error => {
  //  console.log(error);
  return Promise.reject(error);
});axios.interceptors.response.use(response => {
  return response;
}, error => {
  console.log(error.response);
  return Promise.reject(error);
});
#9 Creating Components
We will be creating 3 components
- PostList Component ( for Read)
- Create-Post Component (For Creating and Updating Post)
- PostDetail Component (For the reading full post and performing Delete operation)
#10 PostList Component
In this component, we will be fetching the data from the backend we have created. To do so we will make an Http call in componentDidMount() lifecycle hook. Once we get the data we will update our state using setState()
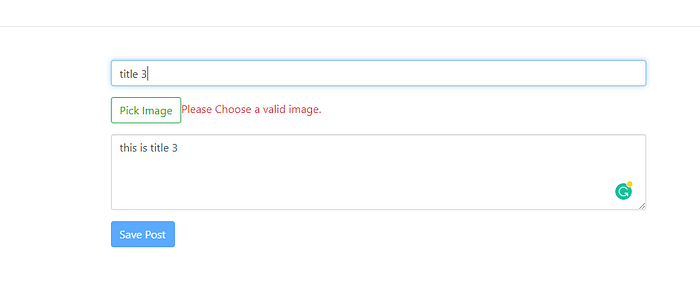
#11 PostCreate Component
In this component, we will be creating a form and we will handle the inputs on changeHandler. Once we are done with the input we will send Http request on the submit method of the form.
#12 Update Operation Using Post Create Component
Here we will use the componentDidMount() lifecycle hook to fetch data and then set the state using setState(). Then we will use this state to fill up the form input values. Then on basis of the URL, we will either update the post or create a brand new post
#13 PostDetail Component To delete Post
In this, we will use the id of Post to view the detailed Post. Also, we will use the same Id to delete the post by passing it as a parameter to the URL, and using the same parameter in the backend we will identify the post by id, and then we will delete it.
#Demo Images
Finally, we are done for this MERN Stack Tutorial using React and Bootstrap 4. I have tried to highlight every essential topic in this tutorial. However, if you have skipped anything you can check out my Github Repo.


This comment has been removed by the author.
ReplyDeleteI really appreciate you saying it’s an interesting post to read. I learn new information from your blog, you are doing a great job. Thank you for sharing meaningful information.
ReplyDeleteHire Dedicated MERN Developer
What is MERN Stack?
ReplyDeletehttps://www.decipherzone.com/blog-detail/mern-stack
MERN is an umbrella term used for MongoDB, Express, React and Node.js. MERN stack is an open-source full-stack JavaScript solution used for faster and easier development and deployment of full-stack applications. MERN is designed to make the process of application development swift and simple.
This comment has been removed by the author.
ReplyDeleteGreat blog with useful information.
ReplyDeleteReact Native Online Course
React Native Training in Chennai
React Native Training in Bangalore
Great Post. Very informative. Keep Sharing!! Thank you.........
ReplyDeleteMern Stack Development Course
Full Stack Development Course
Android App Development Course
Php Laravel Course
Digital Marketing Course
is this work?
DeleteAwesome Article Thanks for sharing your valuable information Are you seeking a Hire mern stack developer to start your own new business? You've arrived at the right location. For your business startup, we offer a customizable multi-service platform that all-in-one solution.
ReplyDeleteMEAN Stack course in Noida
ReplyDeletehttps://aptronsolutions.home.blog/2022/08/04/mean-stack-institute-in-noida-mean-stack-training-in-noida/
Here all content so useful and helpful for beginner and experience both.This site is so amazing, This sites gives good knowledge of Mern-stack ,This is very helpful for me.
ReplyDelete